Diy Farmhouse Kitchen Colr Walls With Dark Brown Cabinets
Ideas for the Kitchen: Cabinet Door Inserts
Dress up your kitchen with easy-to-add door panels
 Family Handyman
Remodel your kitchen quickly and easily by cutting out old wooden door panels and installing new, striking materials, like metal, glass or fabric. Do it yourself to keep the cost low.
You might also like: TBD
Step 1: Decide on new door inset material
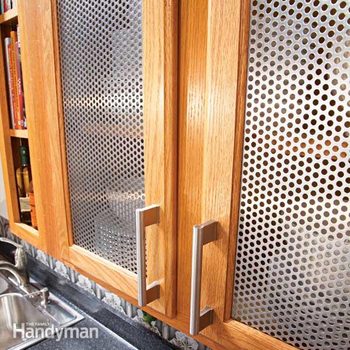
Installing new panels in old cabinet doors can really dress up a kitchen (and new cabinet door panels are a lot cheaper than new cabinets). Insert materials include glass, translucent plastic, copper, metal, fabric, wicker and many others. Adding "feature" inserts to just one or two of your cabinet doors can be striking and very inexpensive. Our homeowners decided to install perforated metal inserts in all of their upper metal cabinet doors. They initially wanted to use stainless steel to match their appliances but went with aluminum after discovering that it costs a third of the price and has a similar look (see "Buying Metal Inserts," below, for tips on ordering).
Homeowner comment:
"Perforated metal inserts kicked our 15-year-old cabinets into the 21st century. Once I got the hang of using the pattern bit, it was a cinch to remove the center door panels and replace them."
Steve Johnson
Step 2: Remove the old cabinet door panels

Photo 1: Locate the lips
A door panel fits into grooves in the door's frame. To remove a panel, just cut away the lips on the back of the door.

Photo 2: Rout away the lips
Run a pattern bit along a guide to remove the lips. Any straight board will work as a guide, but an L-shaped guide with stops speeds up the job.

Photo 2A: Close-up of router bit
A pattern bit simplifies smooth door cutting.
To cut away the lips that secure the door panel (Photo 1), you'll need a "pattern bit"—a straight bit with a bearing that's the same diameter as the cutting diameter. You can buy a pattern bit for about $25, but most are too long to use with a 3/4-in.-thick guide. You may have to shop online to find a shorter bit. One source is routerbits.com. (Search for "3001" to find a bit with a cutting depth of 1/2 in.)
If you're working with just one or two metal cabinet doors, the only guide you'll need is a straight board. If you have a stack of doors to rout, a more elaborate guide will save you time (Photo 2). The stops automatically position the guide without measuring, and you can rout two sides without repositioning.
Examine the back of the door before you rout. If you find any nails, pull them out so they don't chip your router bit. Before you start cutting, set your router depth so the bit just touches the panel. After you cut away the lips, simply lift out the door panel. The router bit will leave rounded corners at each corner of the door frame; square them off with a chisel or utility knife.
Step 3: Install the metal inserts
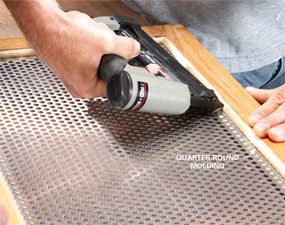
Photo 3: Install the metal cabinet door
Frame the back of the insert with quarter-round molding to hold it in place. If you use a nail gun, aim carefully so you don't shoot through the face of the door.
Prefinish 1/4-in. quarter-round molding and use it to secure the metal cabinet doors inserts (Photo 3). When you place the insert into the door frame, make sure the punched side is face up (the punched side will feel slightly raised around the holes). Fasten the quarter round with 5/8-in. nails or brads. If you don't have a brad nailer or pinner, you can use a hammer; just be careful not to dent the metal.
Buying Metal Inserts
Some home centers carry sheets of metal (including perforated) and will cut them for you for a small fee. But you'll find a much bigger selection online. Look for metal in the 16- to 20-gauge range. We bought directly from McNichols Co. (mcnichols.com) and did all our ordering over the phone. Its Website is full of information (and a bit confusing). Look at its "Products" drop-down menu and go from there.
Do your measuring after you remove the cabinet doors to get accurate insert measurements. Order mesh cabinet doors inserts 1/8 in. shorter in both the length and the width so the inserts just fit in the opening. If stainless is out of your price range, consider aluminum or plain steel (called "mill finish"). You can spray-paint your metal any color you want. No matter what finish your order, wash the metal with paint thinner to rinse off the manufacturing oils. If you choose not to paint the steel, spray it with a clear lacquer to prevent it from rusting.
Required Tools for this Project
Have the necessary tools for this DIY project lined up before you start—you'll save time and frustration.
You'll also need a pattern bit for the router.
Required Materials for this Project
Avoid last-minute shopping trips by having all your materials ready ahead of time. Here's a list.
Similar Projects
Diy Farmhouse Kitchen Colr Walls With Dark Brown Cabinets
Source: https://www.familyhandyman.com/project/ideas-for-the-kitchen-cabinet-door-inserts/
0 Response to "Diy Farmhouse Kitchen Colr Walls With Dark Brown Cabinets"
Post a Comment