How to Sharpen Line Art on Coloring Page From the Internet

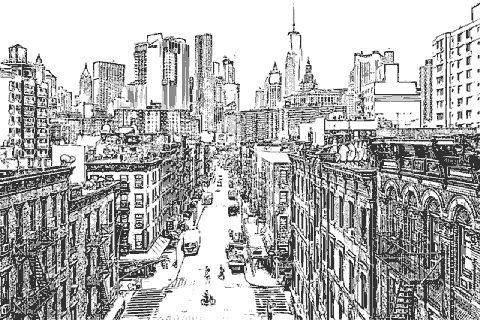
"Fine Pen" Style
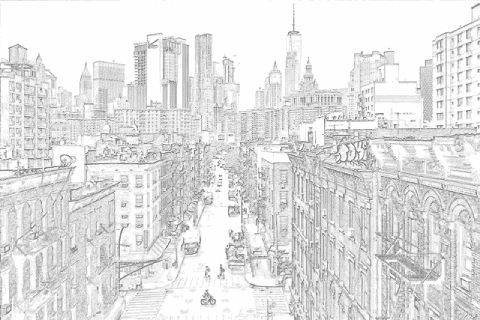
"Smooth Pen" Style
"Pencil" Style

"Colored Pencil" Style
About This Feature
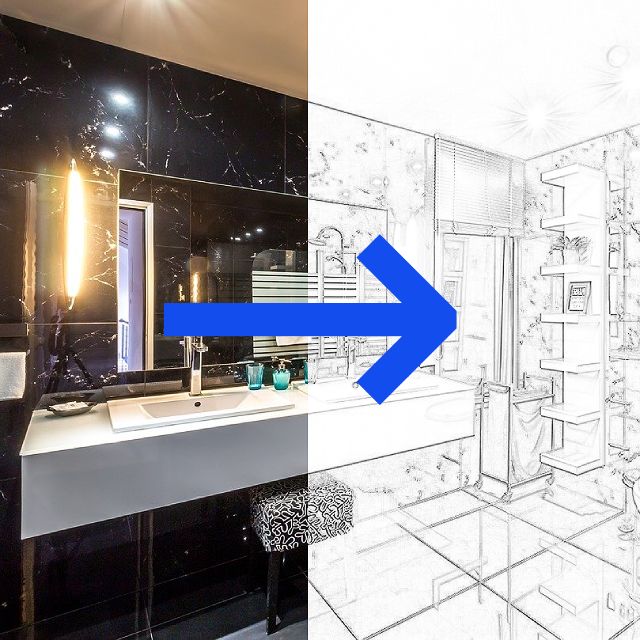
On this page, you can convert your photos or illustrations into line drawings or coloring pages.
(This feature can detect the contours of objects in your uploaded image.)
The conversion can be fully automatic, but you can also set details such as line type (drawing tools to simulate), pen pressure and background(white or transparent).
Supported file formats are JPEG, PNG, GIF, and Heic extensions.
About Line Types

"Fine Pen" Style Example

"Smooth Pen" Style Example
"Pencil" Style Example
"Colored Pencil" Style Example
- Fine Pen(Recommended)
It's like a mapping pen (fine dipping pen) for drawing illustrations.
This can extract lines accurately and is suitable for fine touch drawing.
Because of its wide range of usages and short processing time, it is recommended to choose this option basically.
- Smooth Pen
It's like a G-pen (thick dipping pen) for drawing illustrations.
Like a fountain pen, the lines are pressure sensitive.
Since the lines are clear, anti-aliased and have no shading, the output is close to coloring page, and it's especially suitable for printing.
This option is suitable for converting images with clear outlines, such as manga and anime, or flat color illustrations.
On the other hand, it's not good for converting illustrations which requires delicate touch, noisy photos, low resolution images, and portrait photographs.
It's recommended that the original image is 1280px or larger and is not too compressed.
- Pencil
It looks like rough pencil sketch. Since the position of the lines are clear, it's suitable for tracing lines by yourself over the output image.
This option is recommended for technical drawing such as drafting of buildings or machinery.
Also, if you convert with "Fine Pen" and the lines are whited out or blacked out, try again with "Pencil" and it may work.
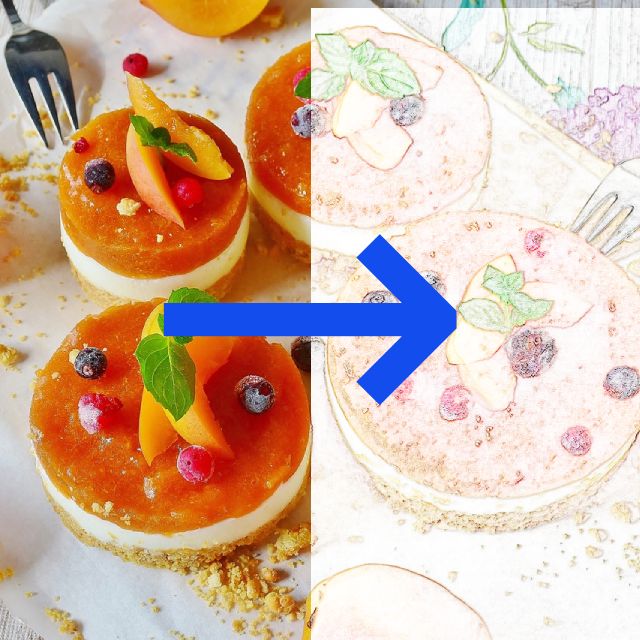
- Colored Pencil
The colors used in the original image will be extracted as outlines.
If you want to make the contour lines less noticeable when applying color, this mode is the best.
It's good for painting watercolor with a soft touch, and it's suitable for converting face photos without losing their original atmosphere, or converting food photos without losing their delicious look.
This option is also useful to use as a coloring book with hints on where to paint in what color if you want to repaint with the same color as the original image.
About Background
If you are to color in analog, it is recommended to use a white background.
If you are to color it digitally, a transparent background is more useful.
If you set the background to transparent, you can add a layer under the output image and color the lower layer, so that the extracted lines will not be hidden in the fill.
About Noise
It's better to use an image with less noise to get better output.
If the original image is a JPEG, it's better to be uncompressed, and the resolution shoudn't be too low.
"Line Type" with the least noise is "Fine Pen" mode.
If the original image is as clean that you can't find noise even when you zoom in to twice the size, there will be few noticable noise in the output image.
If the noise is bothering you after conversion, move the "Noise Reduction" slider in the settings.
About Line Types
"Fine Pen" Style Example
"Smooth Pen" Style Example
"Pencil" Style Example
"Colored Pencil" Style Example
- Fine Pen(Recommended)
It's like a mapping pen (fine dipping pen) for drawing illustrations.
This can extract lines accurately and is suitable for fine touch drawing.
Because of its wide range of usages and short processing time, it is recommended to choose this option basically.
- Smooth Pen
It's like a G-pen (thick dipping pen) for drawing illustrations.
Like a fountain pen, the lines are pressure sensitive.
Since the lines are clear, anti-aliased and have no shading, the output is close to coloring page, and it's especially suitable for printing.
This option is suitable for converting images with clear outlines, such as manga and anime, or flat color illustrations.
On the other hand, it's not good for converting illustrations which requires delicate touch, noisy photos, low resolution images, and portrait photographs.
It's recommended that the original image is 1280px or larger and is not too compressed. - Pencil
It looks like rough pencil sketch. Since the position of the lines are clear, it's suitable for tracing lines by yourself over the output image.
This option is recommended for technical drawing such as drafting of buildings or machinery.
Also, if you convert with "Fine Pen" and the lines are whited out or blacked out, try again with "Pencil" and it may work.
- Colored Pencil
The colors used in the original image will be extracted as outlines.
If you want to make the contour lines less noticeable when applying color, this mode is the best.
It's good for painting watercolor with a soft touch, and it's suitable for converting face photos without losing their original atmosphere, or converting food photos without losing their delicious look.
This option is also useful to use as a coloring book with hints on where to paint in what color if you want to repaint with the same color as the original image.
About Background
If you are to color in analog, it is recommended to use a white background.
If you are to color it digitally, a transparent background is more useful.
If you set the background to transparent, you can add a layer under the output image and color the lower layer, so that the extracted lines will not be hidden in the fill.
About Noise
It's better to use an image with less noise to get better output.
If the original image is a JPEG, it's better to be uncompressed, and the resolution shoudn't be too low.
"Line Type" with the least noise is "Fine Pen" mode.
If the original image is as clean that you can't find noise even when you zoom in to twice the size, there will be few noticable noise in the output image.
If the noise is bothering you after conversion, move the "Noise Reduction" slider in the settings.
How to Sharpen Line Art on Coloring Page From the Internet
Source: https://tech-lagoon.com/imagechef/en/image-to-edge.html
0 Response to "How to Sharpen Line Art on Coloring Page From the Internet"
Post a Comment